Green Thumb Gardening Advice
You’ve got questions, we’ve got answers. Welcome to Hollandia’s exclusive Green Thumb Gardening Advice column. We have Questions & Answers, Gardening Tips & Tricks, even exclusive Hollandia garden designs. Count on Hollandia to help you with all your gardening needs.
Frequently Asked Questions
- Dig a hole the same depth as the root ball.
- Add 4″-6″ of very wet peat moss in bottom of hole (do not add peat moss with PJM Rhododenrons)
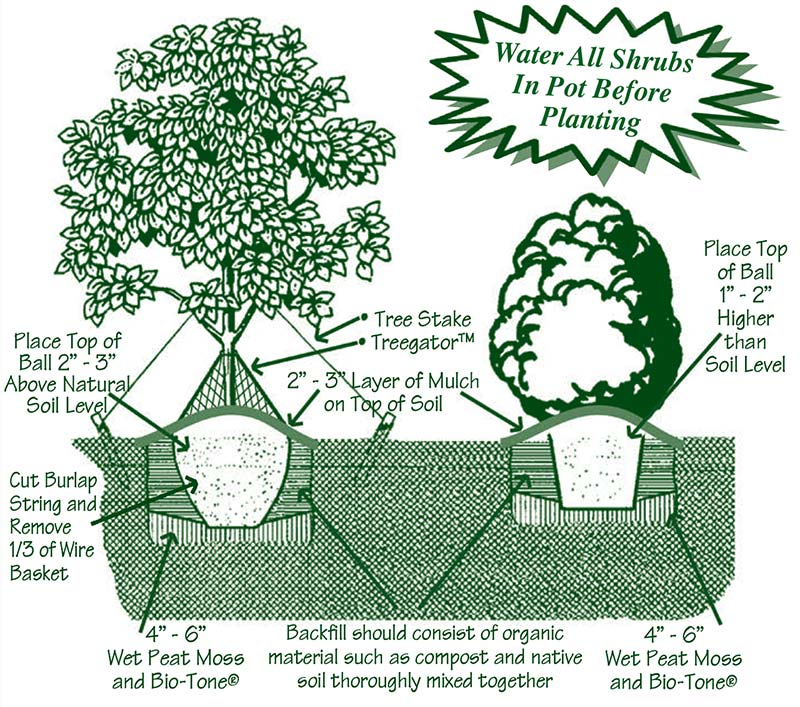
- Place tree in hole. Allow peat moss to surround root ball. Allow root ball to sit 1″-2″ above natural soil line.
- Back fill with regular soil 1/2 way up ball. Cut burlap from neck of tree and push down around the side (do not remove burlap). Finish back filling hole and create a crown, not a bowl.
- A crown will allow water to flow away from the stem and forward toward feeder roots.
- Fertilize with Plant-Tone or Holly-Tone. Use one handful per gallon size of container or 2 handfuls per inch caliper of stem. Scratch into soil.
- Soak well every 5 days if natural rainfall is less than one inch during the week.
If more is better, than a lot should be great! That seems to be the logic when buying grass seed. To get the best results when seeding, it might help to understand a few of the basics.
Let’s take a look at a typical seed label:
First of all, what do those names mean?
They are usually proprietary varieties that were specifically bred for optimum results. With improvements in seed breeding and technology in the past 7-10 years, these new varieties are more disease and pest resistant. However, over half the lawns North America are over seven years old. Newer varieties have definite advantages.
How about germination?
The second set of numbers is the germination rate of the seed. Like anything else there are a different grades and qualities of grass seed. Watch out for this number. The higher the number the better. Why pay for seed that won’t grow?
What is “other crop seed?”
The seed listed here is for the “off types” of seed that can detract from the quality of the lawn. These are usually fillers used in lower priced mixes. The lower the percentage, the better.
Why is there weed seed listed?
If there is any weed seed present it is listed by percentage of weight. While you don’t want any weed seed, it is difficult and expensive to keep it out. Similarly, avoid those listing obnoxious weeds.
What exactly is “inert matter?”
Inert matter is just what it sounds like. This is substance in the box in the box or bag that is not capable of growth. Usually it is filler added to take up space. The lower the percentage, the better.
| Five Pounds Net Weight | |||
|---|---|---|---|
Sun & Shade Grass Seed Mixture | |||
29.65% | Sherwood Perennial Ryegrass | 92% | |
19.70% | Southport Chewings Fescue | 90% | |
19.60% | Salem Creeping Red Fescue | 90% | |
14.88% | Gettysburg Perennial Ryegrass | 92% | |
14.65% | Washington Kentucky Bluegrass | 90% | |
1.46 | Innert Matter | ||
.04% | Other Crop Seed | Lot: SS-95B | |
.02% | Weed Seed | Tested: Jan. 1995 | |
Total: 100% | |||
XYZ Grass Seed Company | |||
It depends on your application. In full sun, figure about 4-5 lbs for 1000 (M) sq. ft. for a new lawn and about 1.5 lbs/M for overseeding. In deep shade your numbers should be more like 3 lbs/M for a new lawn and 1.5 lbs/M for overseeding.
Ready to get going? Measure your area. With an understanding of the basic facts, area, conditions (soil, sun, shade) and a better understanding of how to read a seed label, you’ll have greater success with your next seeding project and save time and money!
Planting Guide for Nursery Stock
3 Easy Steps to Planting your Trees & Shrubs
You have just purchased top-quality plants from Hollandia Nurseries. Be sure to call one of Hollandia’s professional Horticulturists if you have any questions, need advice or assistance regarding your new plants and the planting process. 203-743-0267.
#1 PREPARE SOIL
Successful planting ALWAYS starts with the soil. The best time to improve the soil quality is before or during planting.
- Use a mix of organic matter such as compost to amend the soil.
- 2 Part of Organic Matter( compost) to 2 Parts of existing native soil. (50:50 Ratio)
#2 PREPARE THE HOLE
- Dig a hole 1 ½ to 2 times the width and ONLY as deep as the root ball of the plant. REMEMBER deeper is never better when planting.
- Add 4 – 6″ Peat Moss and measured amount Bio-tone™ into your hole.
- (see Bio-Tone™ bag for details)
- Fill the hole with water, and stir vigorously until you have created a soupy mixture of peat moss, water and Bio-tone™.
#3 PLANTING CONTAINER Trees & Shrubs
- Turn the plant on its side or upside down, tap the bottom of the pot & gently pull the plant out of its container.
- Place the plant into your prepared hole filled with WET Peatmoss and Bio-Tone™ (see preparing hole step)
- Gently Press down on the top of the root ball to allow your plant to be submerged and surrounded in the soupy Peat Moss mixture.
- The root ball should now be 1-2″ ABOVE the natural soil level.
- Backfill around the root ball and create a crown as shown on illustration.
- Add 2-3 handfuls of Plant-Tone™ around the branch line of the plant.
PLANTING BALL & BURLAP Trees & Shrubs:
- Place the plant into your prepared hole filled with WET Peatmoss and Bio-Tone™ (see preparing hole step)
- Press down on the top of the root ball to allow your plant to be submerged and surrounded in the soupy Peat Moss mixture.
- The root ball should be 2-3″ ABOVE the natural soil level.
- Stabilize the plant in the hole by backfilling with your amended soil halfway up the side of the root ball, gently tamp the soil down as you go.
- If the plant is wrapped in burlap or wire cage; after you stabilize the root ball
- Cut string & remove burlap from the neck of the tree, be sure not to damage the trunk or stem.
- Peel back the burlap from the top of the plant allowing the trunk to be free of material.
- After tree is in hole; Cut or Remove back the wire cage that might be exposed after planting.
- Backfill around the root ball and create a crown as shown on illustration.
- Add 2-3 handfuls of Plant-Tone™ around the outer edge of root ball.
4 EASY STEPS After Care Planting for your Trees & Shrubs
#1 WATERING
- Water your plants by hand using a garden hose at ¼” trickle (a size of pencil diameter)
- Watering time should be ½ hour per 1″ caliber of your plant material.
- Water the root area of your plant, it is NOT necessary to water the foliage.
- The best time to water your plants is in the early morning or in the evening.
Container Trees & Shrubs:
Water thoroughly once EVERY 4 DAYS! Unless you get 1″ of rain, then reset your calendar to water on the 4th day of the 1″ rain fall.
Ball & Burlap Trees & Shrubs:
Water thoroughly once EVERY 5-7 DAYS! Unless you get 1″ of rain, then reset your calendar to water on the 4th day of the 1″ rain fall.
Portable watering bags such as a Treegatorw work great to conserve water and aid moisture penetration.
#2 FERTILIZING
Plant-Tone™ is a great choice for all trees, shrubs, flowers, vegetables here in New England. Hollandia recommends adding 2-3 handfuls around the surrounding area of the plant. An additional application is recommended both in the Spring and Fall for all plant material.
Bio-Tone™ is an excellent starter plant food for trees, shrubs, flowers & vegetables. This product contains Mycorrhizae a symbiotic root fungus beneficial to root vitality. See bag for instructions of amount to use.
Holly-Tone™ works best on acid loving plants such as Azalea & Rhododendrons mostly used in sandy areas in our region.
#3 MULCHING
Hollandia Recommends the use of 2-3″ depth of bark mulch to retain moisture around newly planted trees and shrubs. In the Spring. we recommend the application of 1-2″ depth in your landscape for beautification water retention and weed barrier. Do not use a raw wood chip mulch!
*Hollandia uses a Pine-Spruce softwood bark non dyed, all natural mulch for prevention of Artillery Fungus. Artillery Fungus is a natural Bourne fungus found in decaying woods products.
#4 PRUNING
Pruning should be completed by someone who knows the growth habits and flowering time of specific trees and shrubs. When pruning is done properly it will help maintain the plants form that were intended and keep the Landscape full and beautiful. Some benefits of pruning are:
- Maintains the plants healthy condition
- Increase flowering and fruiting of the plant
- Will extend the longevity of the landscape.
Prune Flowering shrubs right after they bloom.
Prune Flowering trees at the appropriate time
Proper pruning will maintain your landscape for 10-15 years.
GUIDE TO PLANTING ANNUALS:
Choose Annuals for proper: Sun/Shade Exposure, Height and Color.
- Till planting area 4-6 inches deep with growing mix soil conditions.
- Soak plants in a wheelbarrow or other similar container in a solution of Jack’s Classic and water.
- Some people pre-mulch area to aid water retention and weed prevention.
- Plant your area of desired plants spacing annuals from 4-12 inches apart, depending on personal preference. Hollandia chooses 6 inches.
- At times we like to trim/pinch annuals prior to planting to promote additional growth.
- Watering of annuals in the ground should only be done when plants are truly dry or just to a wilt.
PS – Some plants wilt due to heat stress, not dryness, DO NOT overwater.
PS2 – Additional feeding with Jack’s Classic every 2-3 weeks is recommended.
To calculate plants needed, measure bed and divided by 4 if planting 6“ apart. Example: 40ft x 2 ft = 80sp ft – 20 plants.
GUIDE TO PLANTING PERENNIALS:
Choose Annuals for proper: Sun/Shade Exposure, Height and Color.
- Layout plants on or near their planting positions still in their pots to prevent drying out. Handle plants one at a time so roots are not exposed to air for long periods of time.
- Dig holes big enough for the root systems.
- With one hand, support each plant in its hole so that the structure of roots and stem or crown will be at or slightly above the soil surface.
- With the other hand, tumble loose soil around the roots and sides, gently pack soil over and around plants.
- Water each perennial so soil and roots settle in together.
- Mulch is recommended for the first year.
Hollandia PLANT GUARANTEE
‘Store CREDIT only’
When HOLLANIDA Plants your material:
1 Year 100% Guarantee on plants (ONE time only) 50% Guarantee on Installation Fee.
When YOU Plant your material:
1 Year 50% Guarantee on plants (ONE time only) With your receipt ONLY.
Hollandia Will Not Guarantee
• Deer or Animal Damage • Ice, Snow & Mother Nature Damage • Insect Damage • Drought, Sun or Shade Locations • Indoor Plants • Perennials • Roses • Annuals • Vegetables & Herbs • Buddleia (Butterfly Bush) • Plants that are higher than ZONE 6.
PLEASE NOTE: Hollandia Nurseries WILL NOT be responsible for: Cut Electrical, Irrigation or Low Voltage Lines. Guarantee excludes Delivery & Hard Goods. Replacement guarantee is One Time Only.
Return Policy: 48 hours on Green Goods (i.e. Nursery Stock, Live Plant Material) 7 Days on Hard Goods (i.e. Gift Shop Items, Fertilizer, Etc.) STORE CREDIT ONLY.
All Trees & Shrubs Are Guaranteed For Replacement One Time Only.
Keep Your Receipt: File your Hollandia receipts in your “Home Improvement” file because landscape additions increase the value of your home similar to other home remodeling projects. *Also, if your trees or shrubs fail to adapt to their new location, you can easily find the receipt you need to get a credit from Hollandia.
Care Sheets
The expert staff at Hollandia Nurseries has put together a series of care sheets for many of our popular plants and trees. Ever wonder why your cyclamen stop blooming after one season? You’ll find your answer here!

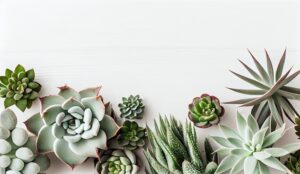
Succulents
Light Requirements: Most succulents thrive in dry, warm climates. Most enjoy sunlight Read More

Live & Fresh Christmas Tree Care
LIVE CHRISTMAS TREES Using a live evergreen as a Christmas tree is Read More
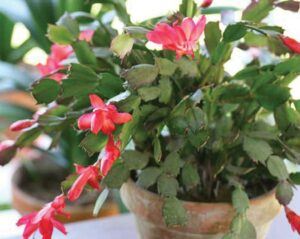
Christmas Cactus
Christmas and Thanksgiving cacti are easy-to-grow, long-lived houseplants offering flowers in a Read More
Spring Cleaning
Cleanup should begin late March/early April. Pruning: Evergreen plants not pruned in Read More

Poinsettias
Transporting Tips: Poinsettias, natives of Mexico, are intolerant of our cold weather Read More
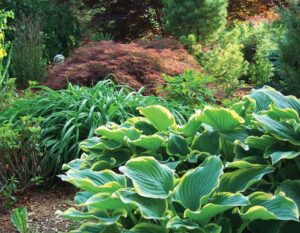
Perennial Care
Many perennials tolerate various light and soil conditions. They can even be Read More
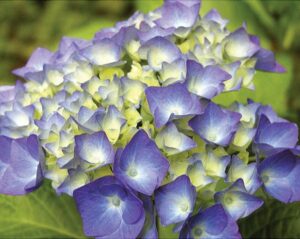
Hydrangeas
Planting: Use Hollandia’s planting guide for planting. To make planting conditions even Read More
Garden Designs
So, you’d like to put together a nice garden, but you’re not sure how to best group your plants. Or maybe you’re just looking for some good ideas for some theme gardens. We have some popular garden designs available to get your creative juices flowing. Feel free to print out any of the designs listed below, and when you’re ready to get started, stop by for all the plants, supplies, and advice you’ll need!
Butterfly Garden

There’s something magical about a garden full of blooms and dancing with butterflies. This garden design will attract all kinds of butterflies and pollinators, creating a beautiful oasis both for you and the ecosystem.
| Plant Name | Average Size | Suggested # to buy |
|---|---|---|
1. Lilac (Syringa vulgaris) | 6-10’ tall x 6-10’ wide | 3 |
2. Hardy Hibiscus (Hibiscus syriacus) | 8-10’ tall x 6-10’ wide | 1 |
3. Butterfly Bush (Buddleia species) | 5-8’ tall x 5’ wide | 3 |
4. Viburnum (Viburnum species) | 3-6’ tall x 3-6’ wide | 1 |
5. Blue Mist Shrub (Caryopteris) | 2-3’ tall x 2’ wide | 3 |
6. Bee Balm (Monarda) | 2-3’ tall x 2’ wide | 3 |
7. Black-Eyed Susan (Rudbeckia) | 3-4’ tall x 3’ wide | 3 |
8. Butterfly Weed (Ascelpias tuberosa) | 2-3’ tall x 2’ wide | 5 |
9. Coneflower (Echinacea) | 3-4’ tall x 3’ wide | 5 |
10. Lavender (Lavendula) | 18-24” tall x 3’ wide | 12-15 |
Bird Garden

Some call them the perfect pets, and this garden design will keep your feathered friends returning day after day.
| Plant Name | Average Size | Suggested # to buy |
|---|---|---|
1. Flowering Crabapple (Malus) or Dogwood (Cornus) | 20′ tall x 10′ wide | 1 |
2. Winterberry (Ilex verticillata) | 6′ tall x 3′ wide | 3 |
3. Weigela (Weigela species) | 2-3′ tall x 2-3′ wide | 3 |
4. Grasses (Miscanthus varieties) | 4-5′ tall x 4-5′ wide | 2 |
5. Wild Roses (Rosa rugosa) | 2-3′ tall x 2-3′ wide | 3 |
6. Junipers (Juniperus “Witoni’ or procumbens ‘Nana’) | 6-12″ tall x 3′ wide | 9 |
7. Cotoneaster (Cotoneaster apiculatus) | 2′ tall x 2′ wide | 3 |
8. Trumpet Vine (Campsis radicans) | vining in shape | 1 |
9. Viburnum (Viburnum species) | 3′ tall x 3′ wide | 1 |
10. Bird House | 1 | |
11. Bird Bath or Fountain | 1 |